Sales Invoices
Easily create Sales Invoices, attach files and send them to your client directly from SmartAccounts.
The list of Sales invoices
Under ‘Sales & purchases‘ – ‘Sales Invoices‘ you can see the list of all your sales invoices. By default, you can see invoices from the beginning of the previous month until today. For the older invoices to be displayed in the list, just change the date range in the date filter.
To find a specific invoice, try to search by inserting the client name or invoice number.
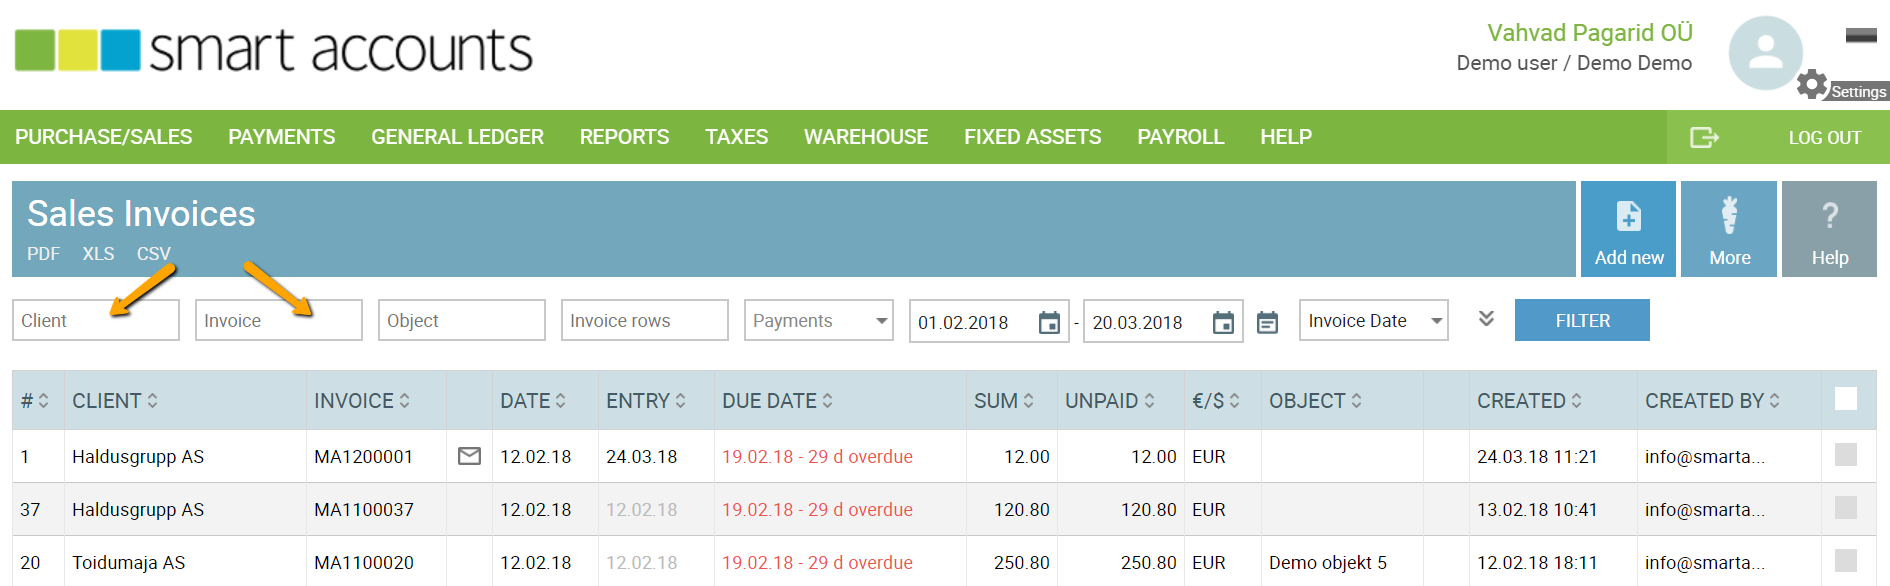
Under the menu item ‘More‘, you can access more options:
- Send – send multiple invoices
- Send to Omniva – send E-Invoices to Omniva invoice management solution
- Export E-invoices – export sales invoices XML files
- Export PDF files (one page at the time – 25 files at once)
- Choose fields – choose which columns you want to see on invoices screen

Add new Sales Invoice
You can add invoices by navigating to ‘Sales & purchases‘ – ‘Sales invoices‘ – ‘Add new‘.
First, please select the client you are invoicing. You can select the client by inserting the name or part of it into the ‘Search‘ box.
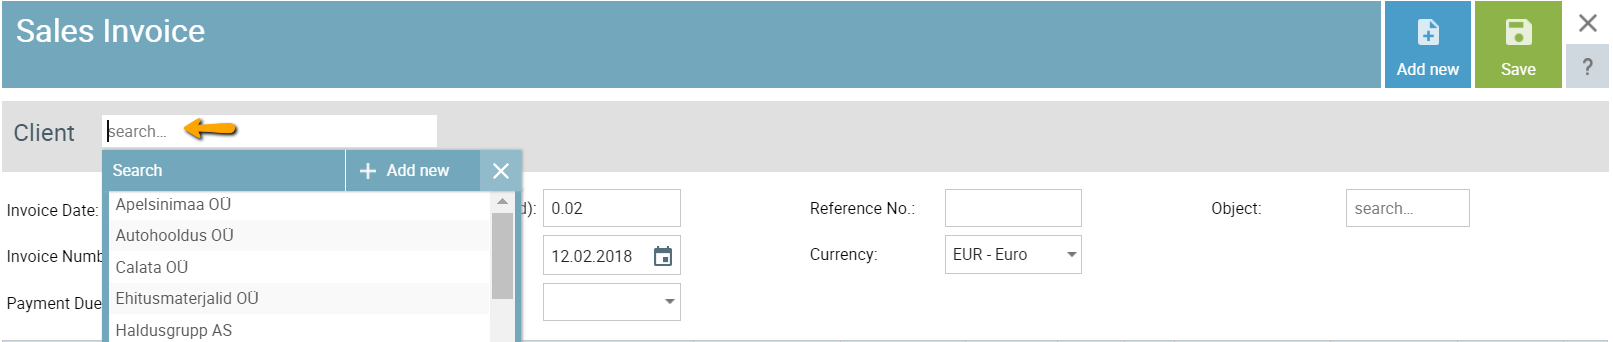
If you want to add a new client to SmartAccounts, please click ‘+ Add new‘ and enter the details of the client.
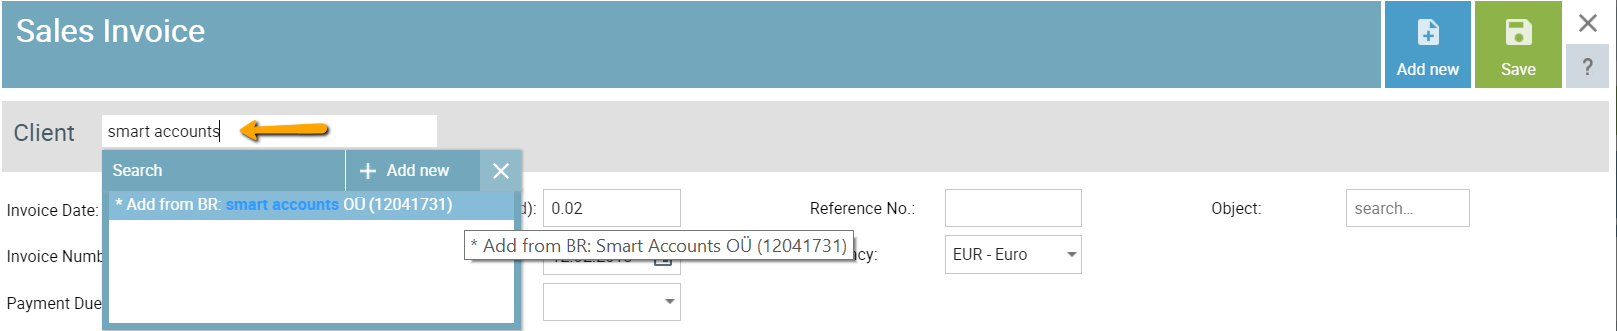
In case your client is an Estonian company, you can easily query data directly from Estonian Business Registry on the invoice screen. Just enter three letters of the name into the ‘Search‘ box and you’ll see results from the business registry and also clients you’ve already added to your system. The new client will be saved after saving the invoice. It’s worth noting that you should add the client from the business registry only once so when you save your first invoice to the client you always choose the same client from your own clients not the business registry entries.
Now enter the remaining invoice details
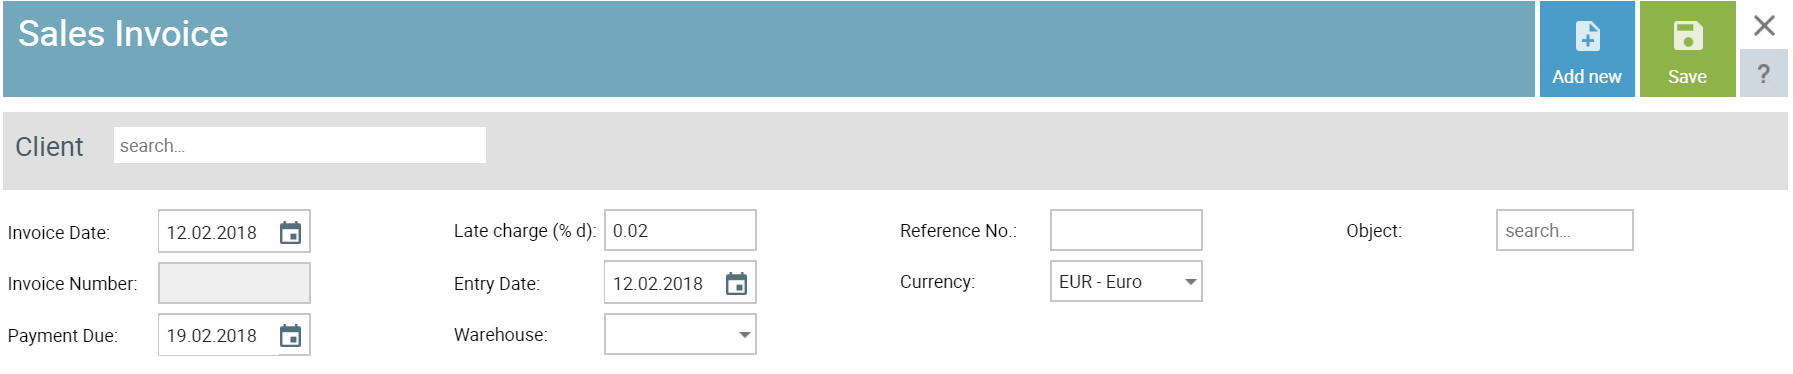
Invoice Date: The date displayed on the invoice.
Invoice number. The invoice number appears after saving the invoice. By default, the number consists of two parts – prefix and seven numbers – of which the first two figures refer to the calendar year and the last five figure refer to the serial number of the sales invoice (in the current business year). The formula which is used to generate the invoice number can be changed under ‘Settings – Settings‘ – ‘Sales invoice number‘.
The invoice number can be changed manually after saving the invoice as well, but it must remain unique.
Due Date. The date you want the invoice to be paid. The default for this can be set under ‘Settings‘ – ‘Settings‘ – ‘Invoice number‘.
Entry Date. The date of the general ledger entry date. Typically the same date as the invoice date.
Warehouse. Company warehouse (choose if you use SmartAccounts stock accounting system)
Reference number. Reference number type and length can be set under ‘Settings‘ – ‘Settings‘ – ‘Sales Invoices‘.
Currency. Invoice currency.
Rate. Invoice currency rate. Displayed if the invoice is issued in a currency other than the euro.
Object. Invoice object. To display the invoice object on the invoice PDF as well, please navigate to ‘Settings‘ – ‘Template Settings‘ – ‘Display the object on the sales invoice‘ – ‘Yes‘.
Invoice rows
An invoice consists of invoice rows, and every row must have an item associated with it. New empty rows are added automatically. You can delete the row by clicking the ‘Delete’ button at the end of the row.
Every invoice has to consist of at least one invoice row and item (service/product/warehouse). The code, description, price, VAT rate and sales/purchase account depend on the chosen item. All of them (except the item’s code) can be adjusted on the invoice row.
The item data can be changed by clicking the ‘Edit‘ icon, and the new item can be added by clicking ‘Add new’. These symbols are used in the same way all across the software: the pen icon is for changing the selected object and the ‘Add new’ button is for adding a new object (in this case it’s an item).
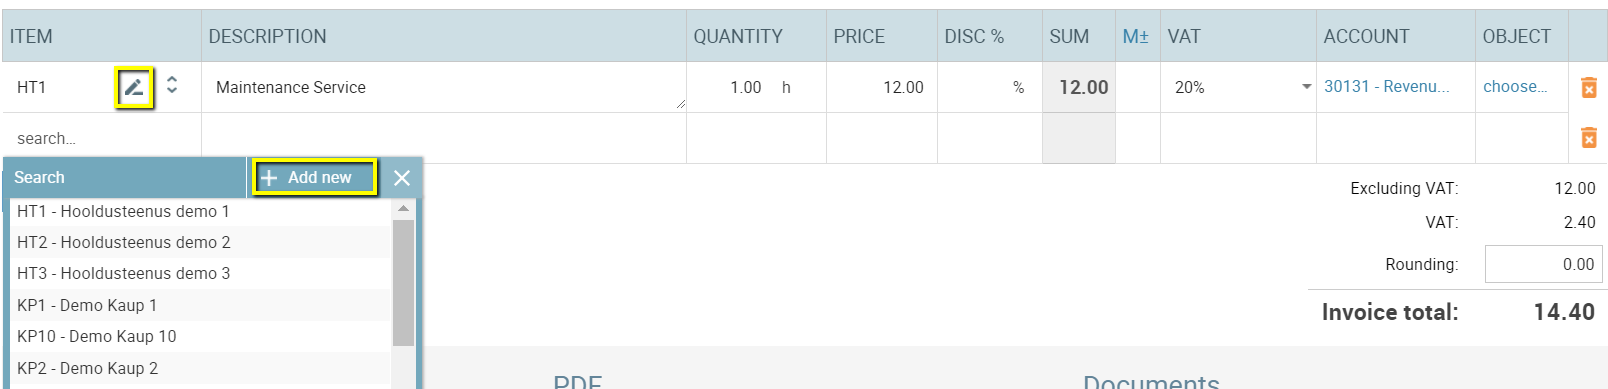
Description. The field allows for a maximum of 1000 characters (please note that according to the e-invoice standard the limit of 500 characters must not be exceeded!).
Discount. By default, the discount percentage that is saved on the client card is applied. You can enter discount percentage directly on the invoice row as well.
Margin. Indicative invoice margin. For warehouse items, the margin is calculated based on the last purchase price. For other types of items, the net cost is preferred. In the absence of net cost, the purchase price is preferred. The margin is displayed by clicking on the margin icon.
Account. The account is defined based on the item card settings and normally doesn’t need to be changed.
Object. Invoice row object (optional).
VAT rates
General VAT rate in Estonia is 24% (starting from 01.07.2025).
More information about different VAT rates here (Estonian).
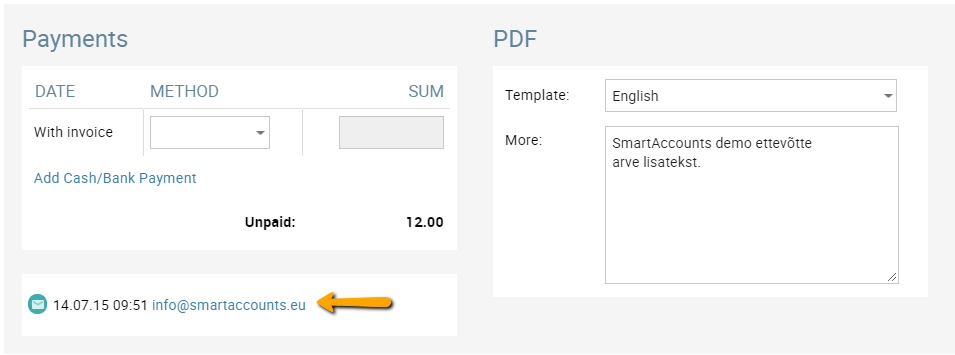
Section ‘PDF’ and ‘Documents’
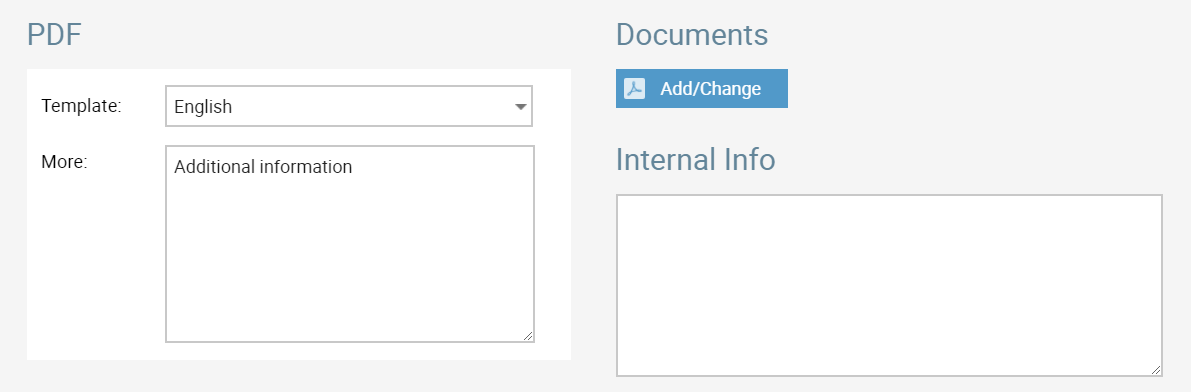
Invoice template
In the PDF section you can change the template for the invoice if necessary (the invoice template can be changed on the ‘Send Invoice’ screen as well).
Additional information
Any additional information concerning the invoice can be entered into box ‘More‘ (this box allows for up to 2000 characters). This data will be printed on the invoice. For example (“The items will be delivered to your subsidiary in Arizona“).
Item code
To display or hide the item code on the invoice PDF, please navigate to ‘Settings‘ – ‘Template settings‘ – ‘Display article code on sales invoice/offer‘ – ‘Yes / No‘.
Documents
If you want to send attachments along with the invoice, then please upload the files under the ‘Documents‘ section.
Now your invoice is ready to be saved and sent out.
Send an Invoice
To send the sales invoices directly from SmartAccounts, please click ‘Send‘.
After clicking ‘Send‘ a new window opens:
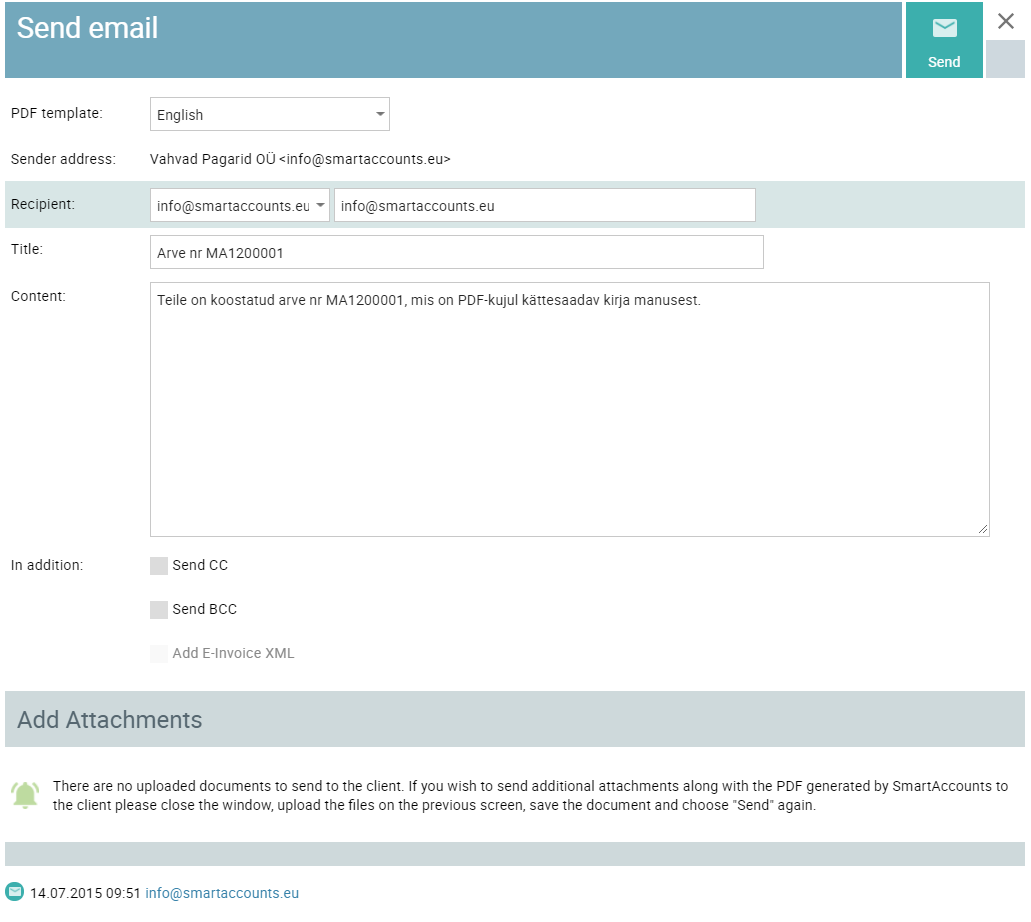
To send an e-mail to multiple recipients please separate the addresses using commas or semicolons.
Information about the sent e-mail is displayed as well (the date, time and the content of the email).
More about the invoice screen
Payments
This section is used to mark the invoice as paid directly from the sales invoices screen. This can also be done under payments but that will be the subject of a separate tutorial.
‘With invoice‘
This payment method should be used when the full, or partial payment takes place at the time of invoicing. By default, we have two payment methods (‘Cash’ and ‘Reporting person’ – both of them are related to currency EUR).
You can create payment methods as you wish under ‘Settings‘ – ‘Payment Methods‘ – ‘Add new‘.
‘Bank payments‘
The second option and more common one is to mark invoices as paid through bank payments (option ‘Add Cash/Bank Payment‘).
‘Add Cash/Bank Payment’ on the invoice screen
Under ‘Add cash/bank Payment’ you can add a date when you received the money and the amount which you received in your bank account.
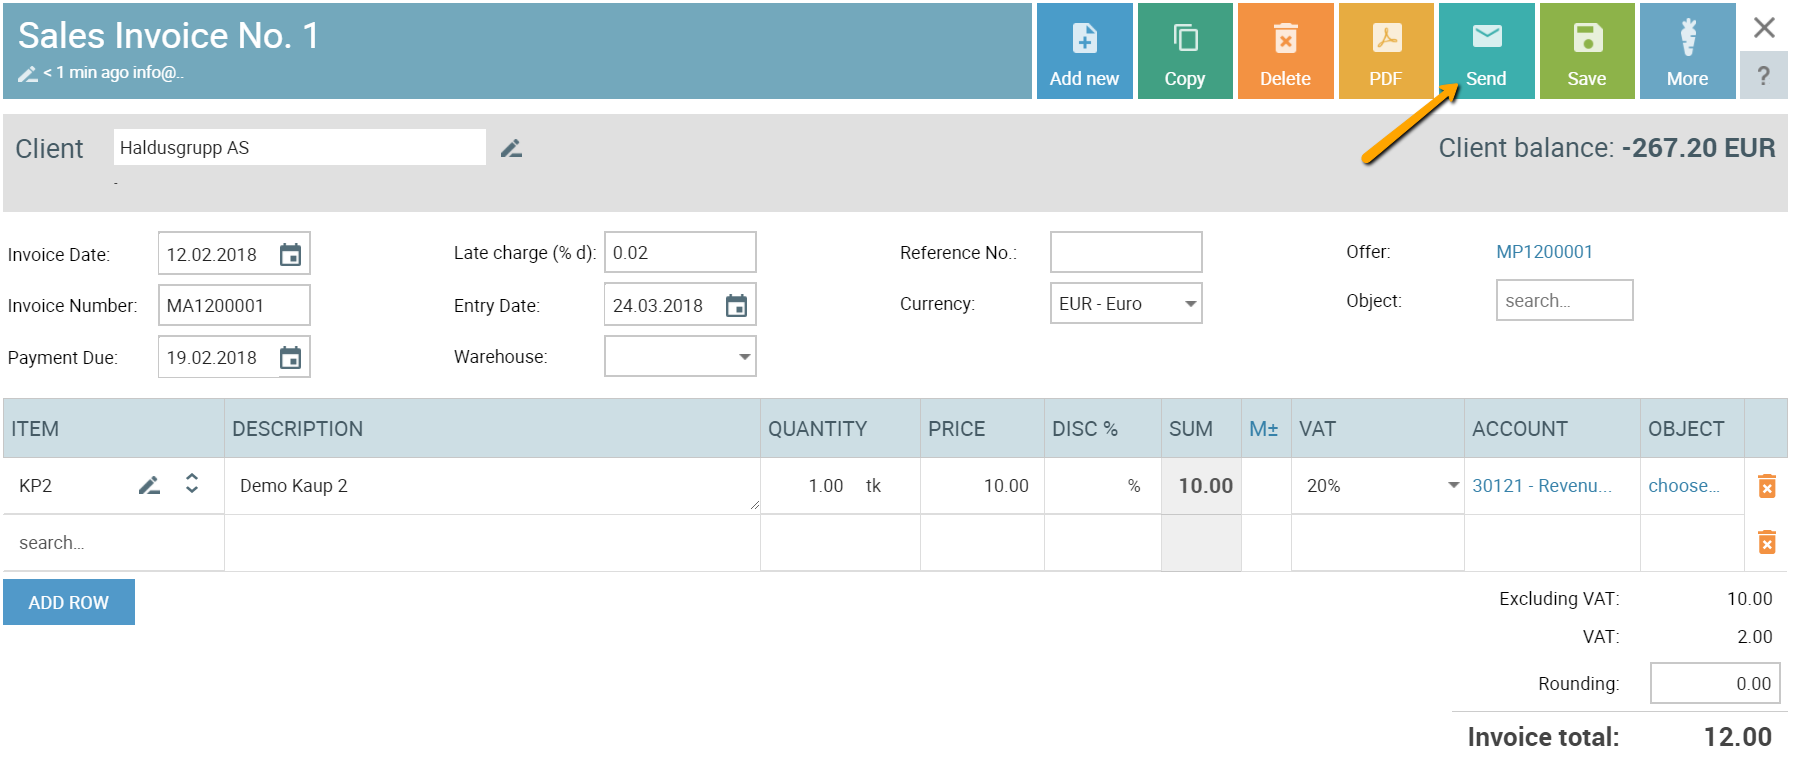
Sales Invoice menu bar

Add new – Add new invoice
Copy – Copy the data of the current invoice (client, invoice rows)
Delete – Delete the invoice
PDF – Generate invoice PDF
Send – Send the invoice to the client
Save – Save the invoice
More – under ‘More’ you can find options set out below:
- Open Entry – See the general ledger entry of the invoice
- E-Invoice – Generate E-invoice XML file
- Convert to periodic – Generate periodic invoice contract based on the current invoice information
- Credit invoice – Create credit invoice
Credit invoices
The easiest way to create a credit invoice is to click ‘More’ – ‘Credit invoice’ in the sales invoice menu bar. To create a credit invoice, just enter the quantities in the invoice rows with a negative sign. As a result, a new invoice with a negative total is created. 
Using this functionality for crediting invoices is not only convenient but also very practical because
- It maintains a reference to the original invoice;
- The credit invoice PDF, as well as e-invoice XML, contains a reference to the original invoice;
- When using the SmartAccounts inventory system, the FIFO prices of the original invoice are calculated for the warehouse movement of the credit invoice.
Netting the credit invoice and the original invoice
To settle your sales and credit invoices, a netting payment should be recorded.
During the credit invoice saving process, SmartAccounts asks you if you’d like the system to net the original invoice and the credit invoice automatically. After the confirmation, both the invoice and the credit invoice will be settled.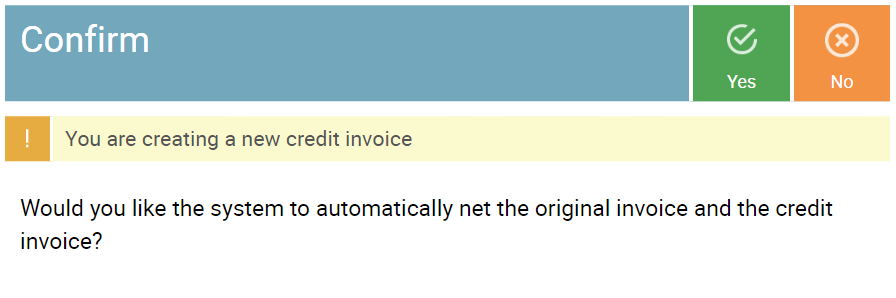 Please note that the date and entry date of the credit invoice must not be earlier than the date and entry date of the sales invoice. To automatically net foreign currency transactions, it is necessary to create a netting bank account tied to the specific currency.
Automatic netting is possible only when at least one bank account is designated as a netting account. This can be checked under ‘Settings’ – ‘Payments’.
E-invoices
The e-invoice XML file
To generate and download an e-invoice XML file (file in XML format according to the e-invoice standard), click ‘More’ – ‘E-invoice’ on the sales invoice menu bar.
To download multiple e-invoices in one XML file, open the list of invoices (‘Sales & purchases’ – ‘Sales invoices’), tick the right invoices, and click ‘More’ – ‘Export e-invoices’.
You can also send an e-invoice XML file by email (click ‘Send’ and tick ‘Add e-invoice XML’). Under ‘Settings’ – ‘Email’ it’s possible to set things up so that the e-invoice XML file is always attached to emails whenever an e-invoice is available.
The e-invoice service
Sending e-invoices in SmartAccounts is very convenient. To send an e-invoice, activate the e-invoice service under ‘Settings’ – ‘Connected services’ in the menu.

You can find out how to activate the e-invoice service here: Activate sending e-invoices
When the e-invoices service is activated, it’s possible to start sending e-invoices. To send an invoice as an e-invoice, click the button ‘More’ – ‘Send e-invoice’ in the sales invoice menu bar.
To send multiple invoices at once, open the list of invoices (‘Sales & purchases’ – ‘Sales invoices’), tick the right invoices, and click ‘More’ – ‘Send e-invoices’.
The e-invoice service is included in the Smart Monthly pricing plan for free and no separate contracts with operators of e-invoices are necessary. Companies with usage-based pricing are billed one entry per sent e-invoice.
With our free e-invoice service, e-invoices are directly sent from SmartAccounts to clients via Finbite Invoice Center. If, in addition to sending e-invoices, there’s a need to use other Finbite Invoice Center services (e.g receiving e-invoices), then it’s necessary to become a contractual customer of Finbite.
Keyboard Shortcuts
Ctrl+S Save, Create report
Esc Close
Ctrl+M Open invoice (PDF)
Dialogue Boxes
Esc Close the invoice add or edit screen
Enter Confirm
Sales Invoices